
Zoom
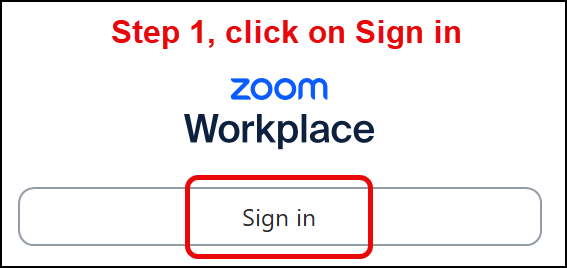

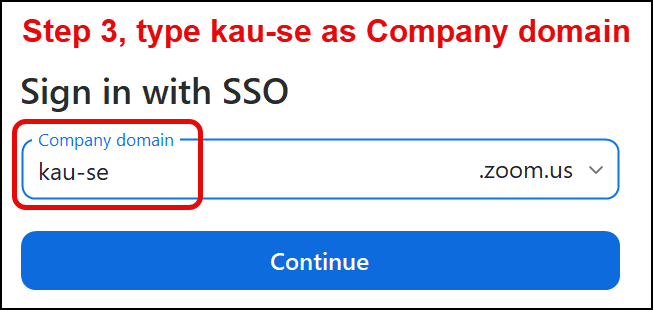
You must always log in with your Kau-ID via SSO. The account is linked to your Kau-ID and the email address you have entered in My Kau. See instruction images 1-3 above, scroll using the arrows next to the image.
- Download the Zoom app
- Why should I install and use the Zoom app?
- Why is it important to log in to the Zoom app with Kau ID (SSO)?
- Create a group chat
- Schedule/start meetings
- Who is permitted to do what in meetings?
- Protect your meetings
- Other meeting settings
- Technical recommendations
DOWNLOAD THE ZOOM APP
You can download and install the Zoom app on your computer directly from the website via Download Client at the bottom of the website.
You can also download the Zoom Workplace app for your smartphone or tablet and log in the same way as on your computer, using KauID (SSO).
As the app is frequently updated by Zoom, please ensure that your Zoom app is updated to the latest version.
If you are unable to install anything, you can participate via a web browser as a last option. We recommend Google Chrome. First, open your web browser, copy and paste the link to the meeting to connect. You will then be asked to select Join from browser when Zoom starts.
Why is it important to log in to Zoom with Kau ID (SSO)?
You must always log in to Zoom with your Kau ID (SSO) in order for your personal Zoom account to be created in the university's Zoom instance. Even if you are only participating in meetings, you should log in because it is important that everyone sees your full name. If you are not logged in, you will be a guest in the meeting. It is also important to log in so that your classmates can find you and, for example, add you to channels or group chats.
In order for your Zoom account to be created, there must be an email address in My Kau. An activation email will be sent to that address from zoom.us, which you will need to manage in order to get started. If you change your email address after this, Zoom will not recognize you and a new account may need to be created.
If you have not logged in for 6 months, your account will be deleted from our Zoom instance. A new account will be created the next time you log in, but with a different personal meeting ID.
Please note that you must select SSO to log in with KauID in the app. The first time you log in, enter the company domain. kau-se.
Why should I install and use the Zoom app instead of accessing my meetings via a web browser?
For the best possible functionality and security in meetings, you should use the Zoom app. For meetings to run via the client, it must be installed. If you participate via a web browser, you may experience limitations with sound and image, screen/document sharing, and if you are participating in Breakout Rooms.
If you are going to be the host of meetings, it is especially important to use the client in order to take full advantage of features such as scheduling, managing participant permissions, Breakout Rooms, Polls, and recording.
Tips! In the Zoom app, you can configure settings for the app itself (audio, video, etc.). Settings for your account (profile picture, personal link, waiting room, etc.) can be configured in the Zoom portal.
Technical recommendations
For detailed technical information and equipment recommendations, visit Zoom's support pages on the web.
What is a meeting ID?
All Zoom meetings have an ID, regardless of whether they are personal, temporary, or scheduled. In order for you and your meeting participants to meet in the same place, you need to keep track of your meeting ID.
Please note that meetings can be started in different ways depending on whether they have been scheduled or not and what ID they have been assigned. See Booking/starting meetings below.
Personal Meeting ID
Your Zoom account comes with a personal “meeting room” that has a unique unique ID number. You can choose whether to schedule your personal meeting ID or use it for ad hoc meetings. If you want to use your personal meeting room for ad hoc meetings, you need to link your personal unique ID number to the Instant Meeting feature via Settings in the Zoom portal.
Tips! Go to Profile in the Zoom portal and click the Use this ID for instant meetings box, then save.
Personal Link
You can create a link to your personal meeting room using, for example, your name (e.g. kau-se.zoom.us/my/firstname-lastname).
Tips! Create your personal link by going to Profile in the Zoom portal and clicking Customize under Personal Link. Enter your name and save.
Create group chat
In the Zoom app, you can create a group chat and specify whether it should be private or public. You can send group chats, files, screenshots, and images. You can also start a Zoom meeting with the members of the group chat.
- Klicka på Teamchat in the Zoom app
- In the left column at Channels Click on the three dots Channel options and choose Create a channel
- In Create a channel, write:
- Name of the group
- Choose whether it should be public or private
- Add members
- Click on Create Channel to save
With Advanced Permissions, you can configure the following settings
- Who can add members to the group
- Should members from outside the university be allowed?
- Who can send messages
- Click on Create Channel to save the settings
To add multiple members to the group
- Select the name of the group
- Click on More Actions
Schedule/start meetings
Instant Meeting – Personal Meeting ID
If you have linked your personal numeric ID to the Instant Meeting feature in the Zoom portal, you can always start meetings from the orange New Meeting button in the client after you have sent out your personal link.
Instant Meeting – One-time meeting ID
If you have not made the above setting, a new meeting ID will be created each time you click the orange New Meeting button in the Zoom client. This means that you cannot start meetings from there if you have sent out your personal link. Instead, you must first start the meeting and then invite people from within the meeting. You can do this easily via Participants and Invite. You can find people within Karlstad University who are logged into Zoom immediately, but you can also copy the temporary link to send via email.
Schedule a Meeting – One-time meeting ID
You can schedule meetings using the client's Schedule function. If you have also linked Zoom to a calendar, for example, you can invite people to your meetings that way. If you do not want to use your personal numeric ID, you can choose to use a different ID. This ID is only valid for this meeting.
Please note that when you schedule meetings from the Schedule feature in Zoom, your personalized link will not be sent out, only the link with the numeric ID. If you want to schedule meetings with your personalized link, you must create the event directly in your calendar and paste your personalized link manually.
Tips! Start all scheduled meetings from the client and the Meetings tab. This ensures that you are logged in to the client and have full functionality as Host.
Schedule a Meeting – Recurring meeting ID
You can also schedule recurring meetings via Meetings/Schedule a meeting in the Zoom portal. Check Recurring Meeting when you start scheduling, then you can choose whether the meetings can be started at any time or repeated daily, weekly, or monthly.
Who is permitted to do what in meetings?
Host
The host of a Zoom meeting is usually the person who created the link and invited participants to the meeting. Rights that only a host has include appointing other “assistant hosts” (co-hosts), starting breakout rooms, starting waiting rooms, and ending the meeting for all participants.
Alternative Host
If you want to give someone else with a KauID the opportunity to start and host your meeting instead of you, you can designate one or more people as Alternative Hosts. You can do this when you schedule the meeting.
Please note that there can only be one Host in the meeting. If you are still going to lead the meeting but want support in managing it, it is better to make someone a Co-Host. See below.
Co-Host
There is no upper limit to the number of co-hosts you can have in a meeting. The rights of a co-host are roughly the same as those of the host, with some exceptions, such as ending the meeting for everyone.
Participant
As a participant in a Zoom meeting, you are granted permission by the Host and Co-Host to do things such as: start/stop your microphone and camera, see other participants, share your screen, chat, and use reaction symbols.
Please note that if you are unable to do the above, it may be because the Host and Co-Host have disabled those features.
Protect your meetings
Join Meeting Before Host
If you don't want your meetings to be open before you start them yourself, you can disable the Join Before Host setting via Settings in the Zoom portal. Anyone who tries to join your meetings before you will see an information box saying “Please wait for the Host to start the meeting.”
Please note that if you have Join Before Host enabled for all your meetings, you can use the scheduling feature to disable the setting for specific meetings.
Waiting Room
To control who joins your meetings and when they are allowed to enter, you can activate the waiting room. There are several ways to do this:
- To temporarily activate the waiting room in an ongoing meeting, simply use the Host tools control. You can activate/deactivate this setting at any time during the meeting.
- Another way to activate it for a specific meeting is via scheduling. Click in the waiting room.
- A third and more permanent method is to enable waiting rooms for all your meetings via Settings in the Zoom portal.
When someone wants to join your meeting and the waiting room is activated, they will see the message “Please wait, the meeting host will let you in soon.” As the host or co-host, you can see who wants to join in the participant list and click Admit or Admit All to let one or more people in at the same time. You can also chat with everyone in the waiting room via the meeting chat and select Everyone (in Waiting Room).
Tips! Even if the waiting room is enabled for all your meetings, it can be temporarily disabled during an ongoing meeting via the Security button in the meeting settings. Read more about the Security button below.
Tips! Via Settings in the Zoom portal, you can customize the message that your meeting participants see when they enter the waiting room. Please note that the message is only visible when a meeting has started.
Tips! If you only want to have waiting rooms for meetings via your personal link, you can set this up in the Zoom portal/Meetings/Personal Room.
Passcode
As an extra security measure, you can choose to set passcodes for your meetings. You can choose whether you want this for all meetings, meetings via your personal meeting ID, or other scheduled or spontaneous meetings via Settings in the Zoom portal.
Please note that enabling passcodes may affect already scheduled meetings, and invitations will need to be resent to include the code.
In-meeting Security
When you are the Host or Co-Host of a Zoom meeting, you have access to a meeting control called Host tools. This allows you to enable/disable security settings for your current meeting. As soon as the meeting ends for everyone, these settings will no longer apply.
Among other things, you can:
- Lock the meeting so no one else can join
- Enable/Disable Waiting Room
- Remove participants who should not be in the meeting
Please note that if you have removed a participant, they cannot rejoin unless you have allowed it in Settings in the Zoom portal. The same applies if you have locked the meeting.
You can also manage what your participants can do in the meeting:
- Enable/disable the ability for participants to share their screen
- Enable/disable the ability for participants to chat
- Enable/disable the ability for participants to change their names
- Enable/disable the ability for participants to turn on their microphones
These settings are especially important if the link to the meeting has been widely distributed and the risk of so-called “Zoom Bombing” increases. If an unauthorized person enters the meeting, they cannot cause much trouble.
The settings only affect participants and not those who are the host or co-host of the meeting.
Other settings
Sound
You can set up your speakers and microphone (Select a microphone and Select a speaker) via the microphone icon in the meeting controls. You can also test your audio settings (Test speaker & microphone).
Tips! Use a USB headset with a proximity microphone for the best possible sound quality. This is especially important in meetings where someone has a hearing disability.
Video
If you have more than one camera connected to your computer, for example in a classroom, you can use the camera icon in the meeting controls to select which one you want to use.
Video images of all meeting participants can be presented in several different layouts: Speaker View (the person speaking is shown in a large image) or Gallery View (all images are the same size). All participants choose the layout they want.
Tips! If you want to create a panel-like situation with up to 9 participants in your meeting, there is a feature called Spotlight Video. You select who should be “spotlighted,” i.e., visible to everyone in a Speaker View, from the participant list.
Tips! If you want to use a virtual background, there are a number of images to choose from in the Zoom client via Video Settings. You can save more images yourself.
Chat
Via Settings in the Zoom portal, you can choose whether chat should be enabled for all your meetings. You can also choose whether you want to have a shared chat but remove direct chat between just two people. If you want to temporarily disable chat during an ongoing meeting, you can do so via the Security button or in the Chat settings via More
Share Screen
When sharing something in Zoom, you can choose between sharing your screen or sharing an application. If you share your screen, everything on your screen will be visible to all meeting participants, and you can switch between, for example, a document and a web page during sharing. If you choose to share a PowerPoint presentation, for example, you are sharing an application and cannot switch to something else without starting a new share.
Please note that you must open the document or presentation you want to share before clicking Share Screen for Zoom to find it.
Tips! If you want to share something with audio, you must check Share computer sound in the screen sharing feature.
Tips! If you have two computer monitors, you can set your presentations to be displayed on one monitor and your meeting participants on the other. This setting is configured in the Zoom client. Click on the gear icon, then General, and check Use dual monitors.
Tips! There is a feature that allows you to use a PowerPoint presentation as a virtual background. Select Advanced in the screen sharing feature and PowerPoint as Virtual Background.
Record
Only the Host or a Co-Host can start a recording. Others can be granted the right to record via the participant list.
Click Record in the meeting controls to start recording in Zoom. Click Record on this computer - the recording will be saved in a folder on your computer. You can pause or stop the recording whenever you want. Multiple recordings can be made during an ongoing meeting. If you only pause, you will get a single long recording. If you stop, you will get multiple recordings.
Conversion of the recording will start after the meeting has ended.
Breakout Rooms
Dividing meeting participants into groups can be done in three different ways during an ongoing meeting:
- Assign automatically. As the host or co-host, you choose how many groups you want to divide the meeting participants into, but Zoom decides who ends up in which group.
- Assign manually. As the host or co-host, you choose how many groups you want and who should be included in each group.
- Let participants choose room. As the host or co-host, you choose how many groups you want, and then the meeting participants can choose which group they want to join.
Tips! If you have many meeting participants and want to divide them into groups manually, you can ask everyone to rename themselves in Zoom according to which group they belong to. For example, if Per Persson belongs to group A, he writes “A Per Persson,” and so on. Everyone is then sorted alphabetically, making it easier to divide them into their groups.
Tips! You can easily rename yourself in Zoom by right-clicking on your video image and selecting Rename.
Tips! More settings for your breakout rooms can be found under Options in the Breakout Room feature. For example, you can set whether the groups should close after a certain amount of time or whether everyone should be given the opportunity to return to the main room/main session whenever they want.